阿里云优惠活动,点击链接进行购买: 一年仅需96.9元即可以购买服务器~
腾讯云优惠活动, 点击链接进行购买一年仅需99元
腾讯云限时开团活动, 点击链接进行购买一年仅需95元
今天在做项目时候,发现了一个问题,那就是父子组件的执行顺序问题,在我印象里,肯定是先执行父组件的生命周期,再执行子组件的生命周期,但其实并不是这样的。我们来看代码:
我们先用 vue-cli 搭建一个项目。(用什么搭建并不重要,我这里为了快速模拟就偷懒不自己配置 webpack 了) 父组件: app.vue
<template>
  <div id="app">
    <hello></hello>
  </div>
</template>

<script>
import Hello from "./components/Hello";

export default {
  name: "app",
  components: {
    Hello,
  },
  beforeMount() {
    console.log("I am parents beforeMount");
  },
  mounted() {
    console.log("I am parents mounted");
  },
  beforeCreate() {
    console.log("I am parents beforeCreated");
  },
  created() {
    console.log("I am parents created");
  },
};
</script>
子组件 hello.vue
<template>
  <div class="hello">
    hello
  </div>
</template>

<script>
export default {
  name: "hello",
  beforeMount() {
    console.log("I am child beforeMount");
  },
  mounted() {
    console.log("I am child mounted");
  },
  beforeCreate() {
    console.log("I am child beforeCreated");
  },
  created() {
    console.log("I am child created");
  },
};
</script>
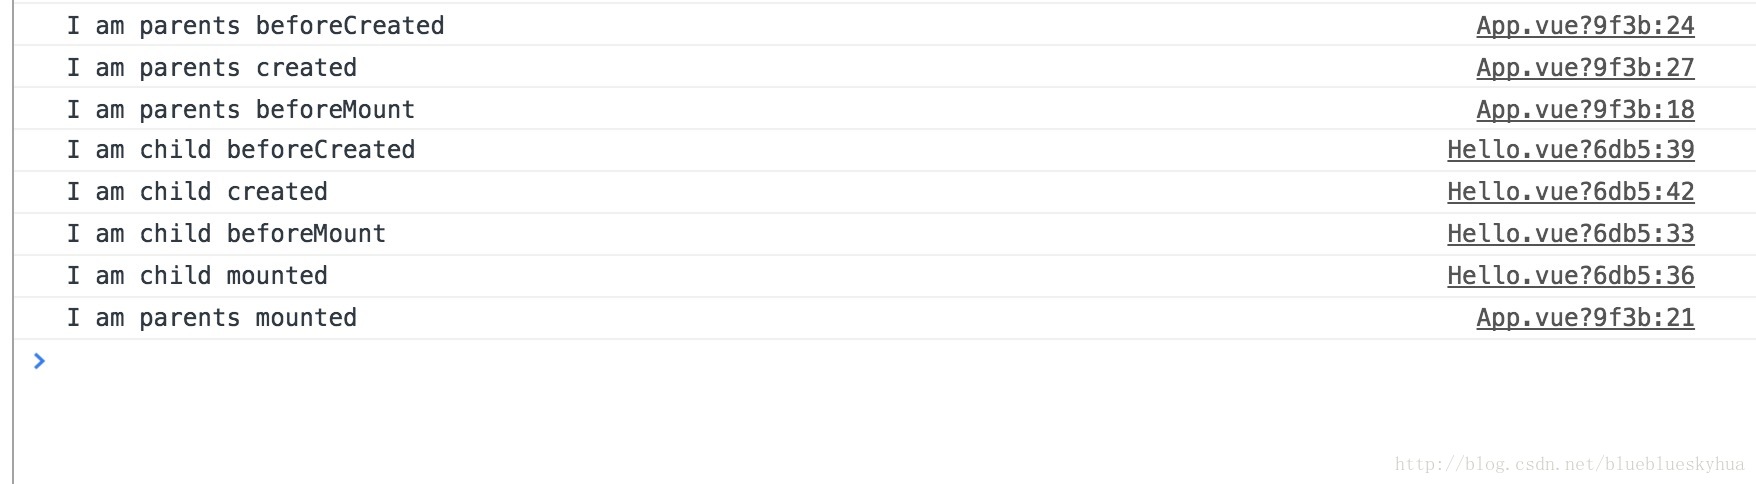
我们从而可以得出结论。 父子组件的执行顺序为, 父组件 beforeCreated ->父组件 created ->父组件 beforeMounted ->子组件 beforeCreated ->子组件 created ->子组件 beforeMounted ->子组件 mounted -> 父组件 mounted。
知道了这个以后,在一些父子组件的接口中,那些强依赖于顺序的接口调用顺序就引刃而解了。
一定要记住父组件的 mounted 最后。 一定要记住父组件的 mounted 最后。 一定要记住父组件的 mounted 最后。
base.vue
<template>
  <div>
    base
  </div>
</template>

<script>
export default {
  beforeMount() {
    console.log("I am base beforeMount");
  },
  mounted() {
    console.log("I am base mounted");
  },
  beforeCreate() {
    console.log("I am base beforeCreated");
  },
  created() {
    console.log("I am base created");
  },
};
</script>
hello.vue
<template>
  <div class="hello">
    hello
  </div>
</template>

<script>
import Base from "./base.vue";

export default {
  extends: Base,
  beforeMount() {
    console.log("I am beforeMount");
  },
  mounted() {
    console.log("I am mounted");
  },
  beforeCreate() {
    console.log("I am beforeCreated");
  },
  created() {
    console.log("I am created");
  },
};
</script>
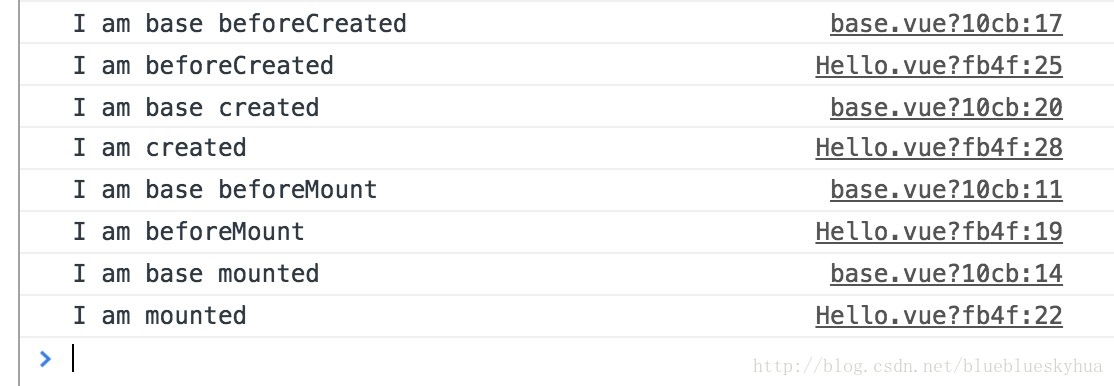
可以看到生命周期是交替执行的。
理解了以上的过程,我们可以来进行一个应用,我们在开发项目的时候都知道,一旦项目大了,代码就特别多,而且对于生命周期也难以维护,我们就这样采取以下的方式,会让你的代码整洁许多。 base.vue
<template>
  <div class="hello">
    base
  </div>
</template>

<script>
export default {
  mounted() {
    this.handleMounted();
  },
};
</script>
hello.vue
<template>
  <div class="hello">
    hello
  </div>
</template>

<script>
import Base from "./base.vue";

export default {
  extends: Base,
  methods: {
    handleMounted() {
      console.log("mounted");
    },
  },
};
</script>
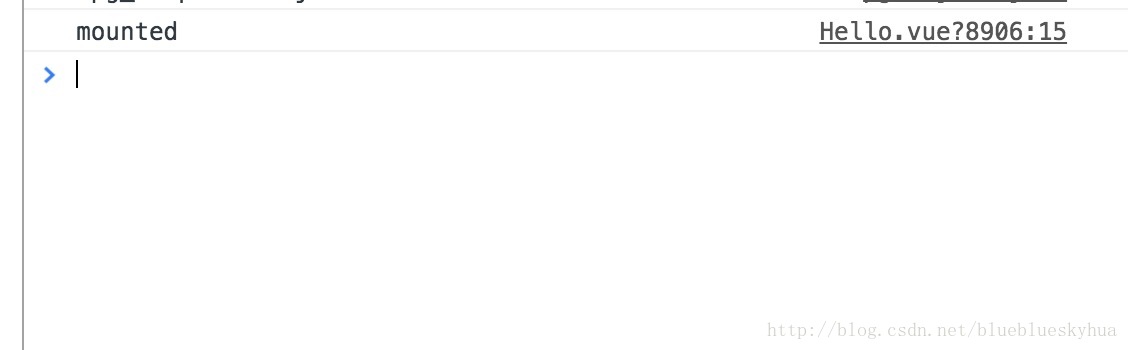
结果
这样有什么好处呢,我们可以更加关注组件编写的方法的过程,不必重复去定义一些生命周期,在一个父组件中统一分发了,这样在一个庞大的项目中,我们就可以更加愉快的编写代码了。整个逻辑也更加清晰。